
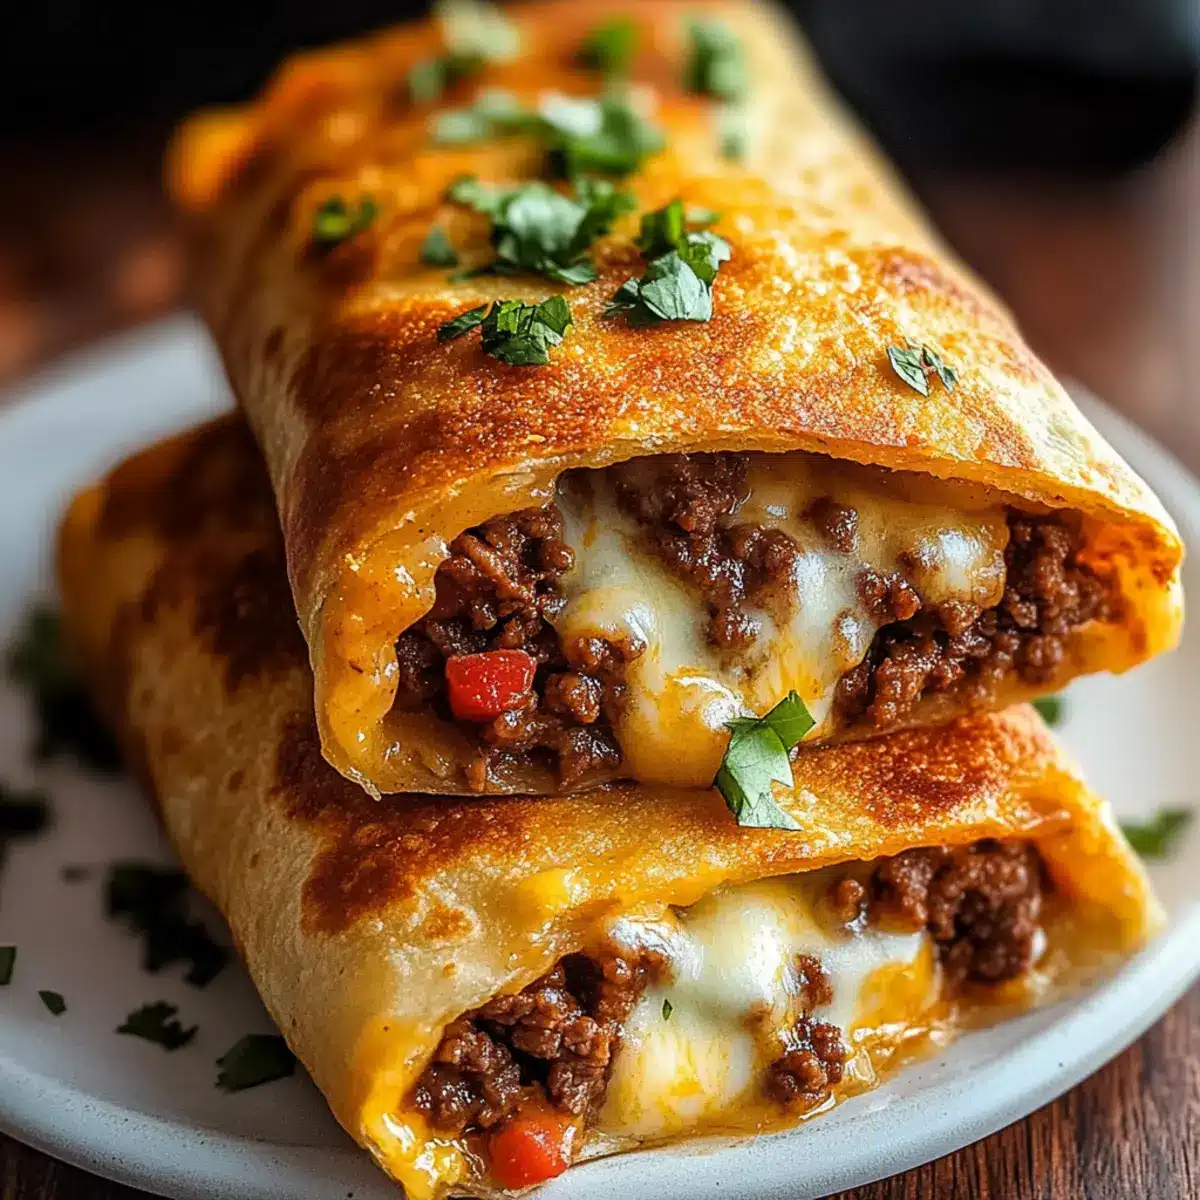
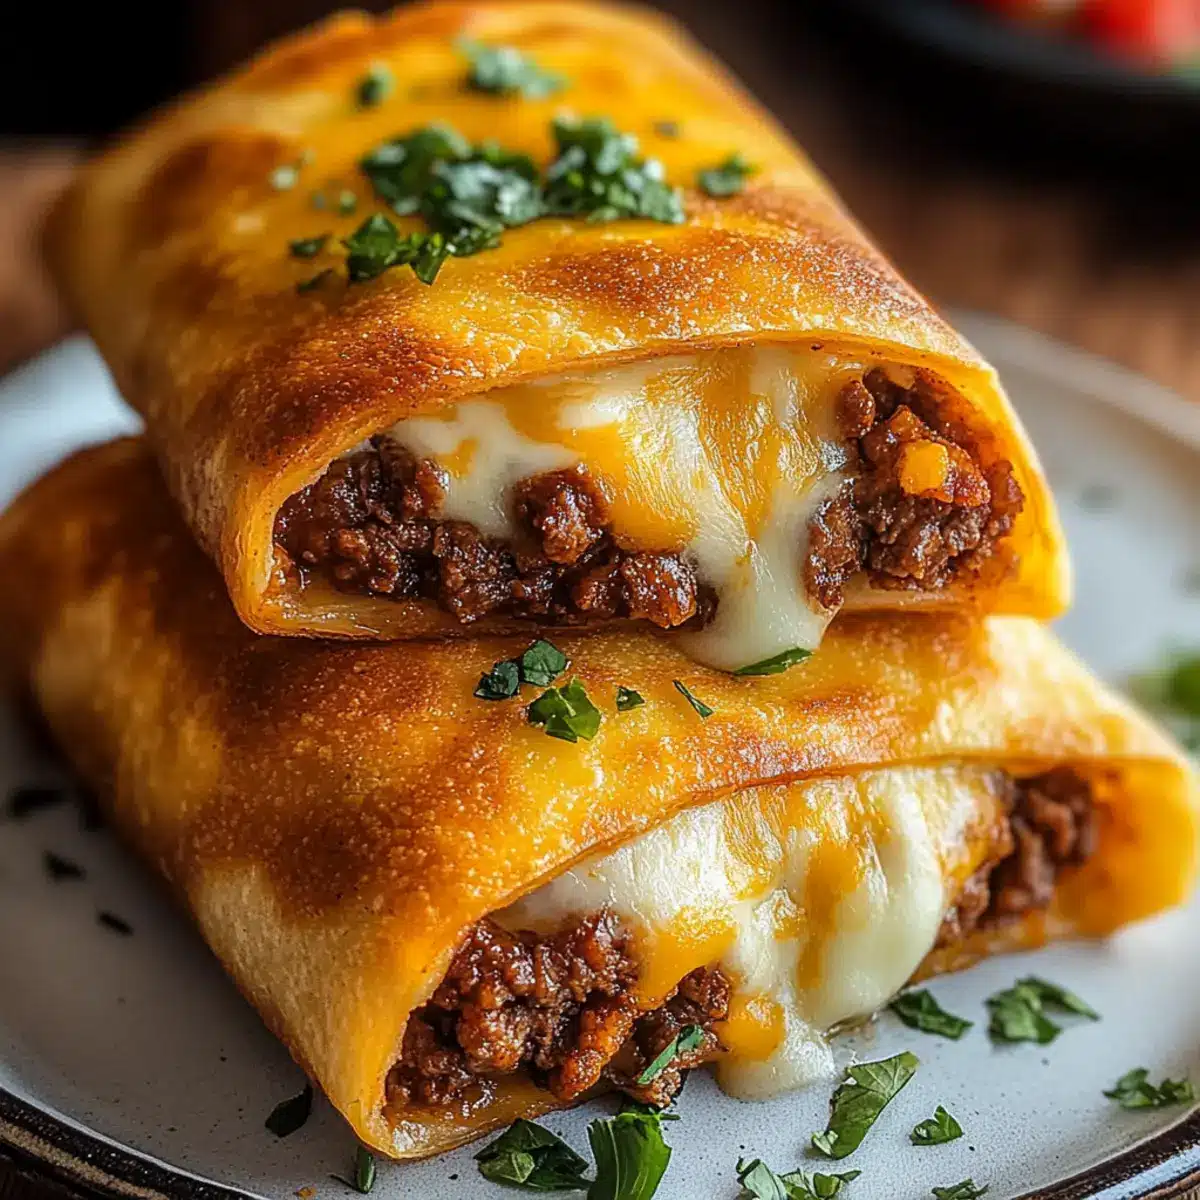
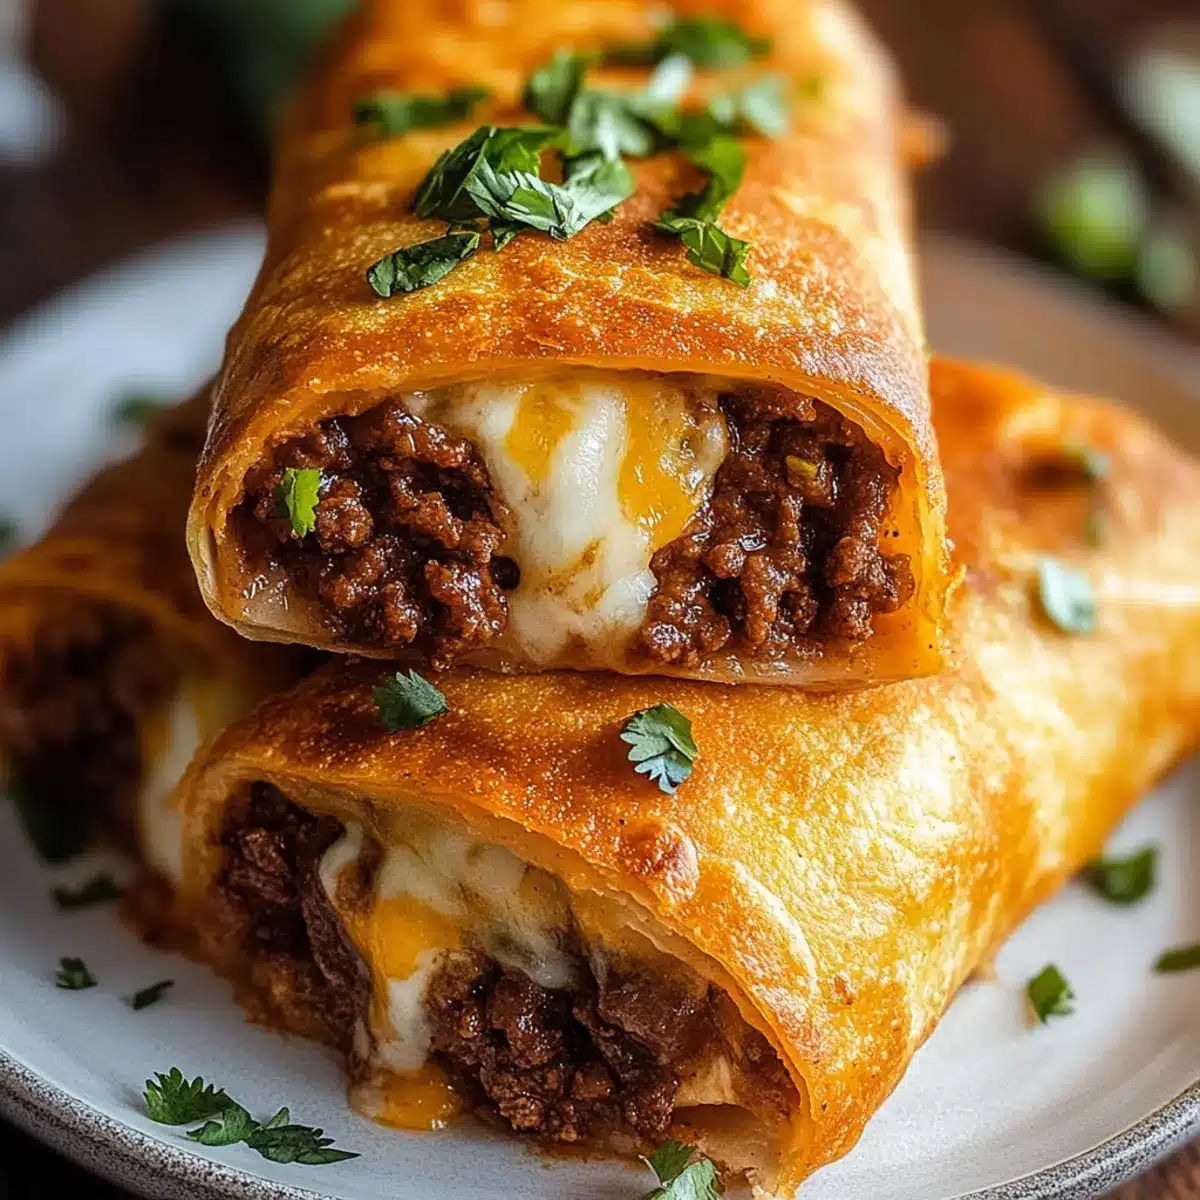
The sizzle of hot oil and the intoxicating aroma of seasoned beef wafting through my kitchen transports me straight to my favorite Tex-Mex joint. That’s right—today, we’re diving into a Beef and Cheese Chimichangas Recipe that captures all the magic of those crispy, golden delights, right in your home. Not only are these chimichangas a gorgeous crowd-pleaser perfect for family dinners, but they also come with the added perk of being fully customizable—so you can spice them up or keep them classic. What’s even better? You can prepare them ahead of time and pop them in the freezer, making them a fantastic option for those busy weeknights when takeout no longer excites you. Are you ready to roll up some deliciousness?
Why Trust This Chimichangas Recipe?
Reliable and easy-to-follow instructions ensure that even novice cooks can master these chimichangas on the first try! Versatile in nature, you can easily switch up the filling, making room for a spicy twist or vegetarian delight. Crispy texture awaits you—whether you fry or bake, you’ll achieve that perfect crunch. Make-ahead option allows for stress-free meal prep, perfect for busy weeknights. Pair with a side of fresh pico de gallo or consider stacking them alongside a delightful Fried Chicken Sandwich for an impressive feast!
Beef and Cheese Chimichangas Ingredients
For the Filling
• Ground Beef – This is the main protein source, providing richness and flavor. You can substitute shredded chicken or turkey for a lighter option.
• Small Onion – Adds depth and sweetness; shallots can serve as a milder alternative.
• Garlic – Enhances aroma and flavor; minced garlic can be swapped with garlic powder for convenience.
• Taco Seasoning – Essential for Tex-Mex flavor; try using homemade blends of chili powder, cumin, and paprika if you’re feeling adventurous.
• Salsa – Keeps the filling moist and flavorful; using tomato sauce can create a milder flavor profile.
• Refried Beans – Adds creaminess and helps bind the filling; omit for a lighter version or use black beans for a twist.
• Shredded Cheese – Offers creaminess and gooey texture when melted; cheddar and Monterey Jack are both delightful options.
For Assembly
• Flour Tortillas – Wraps your filling, ensuring that the chimichangas hold their shape; opt for large (10-inch) tortillas and warm them first to prevent cracking.
For Cooking
• Vegetable Oil – Used for frying or brushing for baking, contributing to that delightful crispiness; can be substituted with canola or olive oil.
Feel free to explore other exciting variations of this Beef and Cheese Chimichangas Recipe, such as adding jalapeños for some heat or swapping the beef for scrambled eggs in a breakfast twist!
Step‑by‑Step Instructions for Beef and Cheese Chimichangas Recipe
Step 1: Cook the Filling
In a large skillet, heat a splash of oil over medium heat. Add the ground beef and chopped onion, cooking until the beef is browned and the onion is soft, about 5-7 minutes. Drain excess grease, then stir in minced garlic, taco seasoning, and salsa. Let the mixture simmer for 2-3 minutes, allowing the flavors to meld and ensuring your Beef and Cheese Chimichangas will be flavorful.
Step 2: Prepare the Tortillas
While the filling simmers, warm your flour tortillas in a microwave or on a skillet to make them pliable, preventing cracking. Place a warm tortilla on a flat surface, and spread a spoonful of refried beans in the center. This will create a creamy base before adding your savory beef mixture and a handful of shredded cheese.
Step 3: Assemble Chimichangas
To assemble your Beef and Cheese Chimichangas, fold in the sides of the tortilla, then roll it tightly from the bottom up to secure the filling. Ensure the seam is facing downwards to keep everything in place. Repeat this step for the remaining tortillas and filling, making a delightful batch ready for cooking.
Step 4: Choose Your Cooking Method
For frying, heat vegetable oil in a skillet to 350°F (175°C). Carefully add the chimichangas seam-side down, frying for 2-3 minutes on each side until they are golden brown and crispy. Alternatively, for baking, preheat your oven to 400°F (200°C). Brush the chimichangas with oil, place them seam-side down on a baking sheet, and bake for 20-25 minutes until crisp.
Step 5: Serve and Enjoy
Once the Beef and Cheese Chimichangas are cooked, let them rest for a few minutes. This will help develop the flavors further. Serve with a dollop of sour cream, guacamole, or a side of salsa, allowing everyone to customize their delicious Tex-Mex experience!

How to Store and Freeze Beef and Cheese Chimichangas
Fridge: Store leftover Beef and Cheese Chimichangas in an airtight container for up to 3 days. Reheat in the oven or air fryer to retain crispiness.
Freezer: For longer storage, freeze uncooked chimichangas for up to 2 months. Place them in a single layer on a baking sheet, then transfer to a freezer-safe bag once frozen.
Thawing: When ready to enjoy, thaw the chimichangas in the fridge overnight. Cook from frozen by baking at 400°F (200°C) for 25-30 minutes until heated through.
Reheating: If reheating leftovers, avoid the microwave to maintain crispness. Instead, use an oven or air fryer to enjoy that delicious crunch again!
Beef and Cheese Chimichangas Variations
Feel free to make this flavorful dish your own by trying out these fun and delicious variations!
-
Bean & Beef: Mix refried beans into the beef filling for extra creaminess and protein. The combination adds a delightful texture and richness that elevates these chimichangas to another level.
-
Spicy: Add diced jalapeños or use pepper jack cheese to kick up the heat. This fiery twist will tantalize your taste buds and bring a lively flair to the dish.
-
Breakfast: Swap the ground beef for scrambled eggs and crispy bacon for a hearty breakfast chimichanga. It’s a fantastic way to enjoy Tex-Mex flavors as part of your morning routine!
-
Vegetarian: Replace the beef with sautéed bell peppers, zucchini, and black beans for a delicious veggie version. This colorful option is packed with nutrients and still delivers on flavor.
-
Cheesy Queso Top: Top cooked chimichangas with warm queso dip or enchilada sauce for a gooey, saucy finish. This addition takes your dish to a whole new level of indulgence!
-
Creamy Avocado: Blend some avocado into your filling for a rich, creamy texture. It complements the flavors beautifully and adds a healthy twist!
-
Herbed Touch: Incorporate fresh herbs like cilantro or chives into your beef mixture. Their fragrant notes will elevate the dish and delight your senses.
-
Crispy Cornmeal Coating: Before frying, dip chimichangas in cornmeal for an extra crispy exterior. This fun twist adds texture while keeping the flavors intact.
Whether you’re feeling adventurous or just want to mix things up, these variations can easily be combined for an unforgettable meal! Don’t forget to check out our delicious Ground Beef Burger recipe for another hearty option or our flavorful Chopped Chicken Sandwich for a lighter twist!
What to Serve with Beef and Cheese Chimichangas
Experience a festive culinary adventure by pairing your meal with delightful sides that bring out the best in your chimichangas.
-
Crispy Fresh Salad: A refreshing salad with mixed greens, avocado, and a citrus vinaigrette adds a burst of flavor, balancing the richness of the chimichangas.
-
Zesty Guacamole: Creamy avocados, cilantro, and lime juice create a zesty dip that perfectly complements the savory flavors in your chimichangas.
-
Spicy Salsa: A tangy and spicy salsa brings an extra kick, enhancing the overall Tex-Mex experience while keeping your taste buds excited.
-
Mexican Rice: Fluffy, seasoned rice rounds out the meal, providing a comforting base that works harmoniously with the crispy chimichangas.
-
Black Beans: These fiber-rich legumes offer earthy flavors and a creamy texture, adding a hearty element to your plate.
-
Sweet Plantains: Caramelized plantains add a sweet contrast to the savory chimichangas, creating a harmonious blend of flavors on your palate.
-
Ice-Cold Margaritas: A classic pairing, these refreshing beverages enhance the festive vibe of your meal, making every bite of chimichangas even more enjoyable.
-
Churros for Dessert: For a sweet finish, serve warm churros dusted with cinnamon sugar, providing the perfect ending to your delightful Tex-Mex feast.
Expert Tips for the Best Beef and Cheese Chimichangas
-
Warm Tortillas: Always warm your tortillas before filling to prevent cracking and ensure they roll up easily.
-
Filling Consistency: Avoid oversaturating your filling with too much salsa; it can make the chimichangas soggy. Aim for a well-balanced mixture.
-
Secure Seams: If needed, use toothpicks to secure your chimichanga seams, ensuring they don’t open during cooking.
-
Oil Temperature: For frying, consistently monitor oil temperature. Too hot can burn the outside, while too cool may leave the insides undercooked.
-
Healthy Swap: For a lighter Beef and Cheese Chimichangas Recipe, consider using lean ground meat or baking instead of frying for a crispy finish.
-
Freezing Tips: When making a batch to freeze, assemble but don’t cook them. Place uncooked chimichangas in an airtight container for up to 2 months.
Make Ahead Options
These Beef and Cheese Chimichangas are a fantastic option for meal prep enthusiasts looking to save time on busy weeknights! You can prepare the filling and assemble the chimichangas up to 24 hours in advance, storing them in the refrigerator (make sure to cover them tightly to keep them fresh). Alternatively, you can freeze uncooked chimichangas for up to 2 months—just ensure they’re well-wrapped in plastic wrap and placed in an airtight container. When you’re ready to cook, simply fry or bake them straight from frozen, adjusting the cooking time as needed. This way, you’ll have a flavorful, crispy meal ready with minimal effort!
Beef and Cheese Chimichangas Recipe FAQs
What type of ground beef should I use for the filling?
Absolutely! For the filling, I recommend using lean ground beef, around 80/20, which balances flavor and fat content. If you prefer a lighter option, shredded chicken or turkey works wonderfully as well. Just keep in mind that the seasoning will need to adapt to match the flavor profile of the protein you choose.
How should I store leftover chimichangas?
Very simple! You can store leftover Beef and Cheese Chimichangas in an airtight container in the fridge for up to 3 days. When you’re ready to enjoy them again, reheat them in the oven or an air fryer for that crispy texture; avoid the microwave as it can make them soggy!
Can I freeze uncooked chimichangas?
Definitely! To freeze uncooked Beef and Cheese Chimichangas, assemble them as instructed, then place them in a single layer on a baking sheet. Freeze until solid, then transfer to a freezer-safe bag for up to 2 months. When you’re ready to cook, no need to thaw—just bake them straight from the freezer and adjust the cooking time!
What do I do if my chimichangas are falling apart during cooking?
Oh no! If your chimichangas fall apart, it often means the tortilla wasn’t secured properly. To avoid this, ensure you fold the sides tightly and roll them seam-side down. If you’re still having trouble, try using toothpicks to secure the seams before frying or baking; just remember to remove them before serving!
Are there any dietary considerations for these chimichangas?
Of course! If you have dietary restrictions, you can easily customize the Beef and Cheese Chimichangas. For a vegetarian option, swap the beef for sautéed veggies and black beans. Be mindful of allergies—if you or your guests are sensitive to gluten, seek out gluten-free tortillas, and for dairy-free needs, use non-dairy cheese alternatives. Enjoy with a safe and delicious twist!
How can I make these chimichangas spicier?
The more the merrier! To add some heat, consider incorporating diced jalapeños into the beef mixture or using pepper jack cheese for a spicy kick. You can also serve them with a spicy salsa or a drizzle of hot sauce just before serving for an extra layer of flavor. Enjoy!
Crispy Beef and Cheese Chimichangas Recipe You'll Love
Ingredients
Equipment
Method
- In a large skillet, heat a splash of oil over medium heat. Add the ground beef and chopped onion, cooking until the beef is browned and the onion is soft, about 5-7 minutes. Drain excess grease, then stir in minced garlic, taco seasoning, and salsa. Let the mixture simmer for 2-3 minutes.
- While the filling simmers, warm your flour tortillas in a microwave or on a skillet. Place a warm tortilla on a flat surface, and spread a spoonful of refried beans in the center.
- To assemble, fold in the sides of the tortilla, then roll it tightly from the bottom up to secure the filling. Repeat this for the remaining tortillas.
- For frying, heat vegetable oil in a skillet to 350°F (175°C). Carefully add the chimichangas seam-side down, frying for 2-3 minutes on each side until golden brown. For baking, preheat oven to 400°F (200°C) and bake for 20-25 minutes until crisp.
- Let the chimichangas rest for a few minutes before serving. Serve with sour cream, guacamole, or salsa.
Leave a Reply