
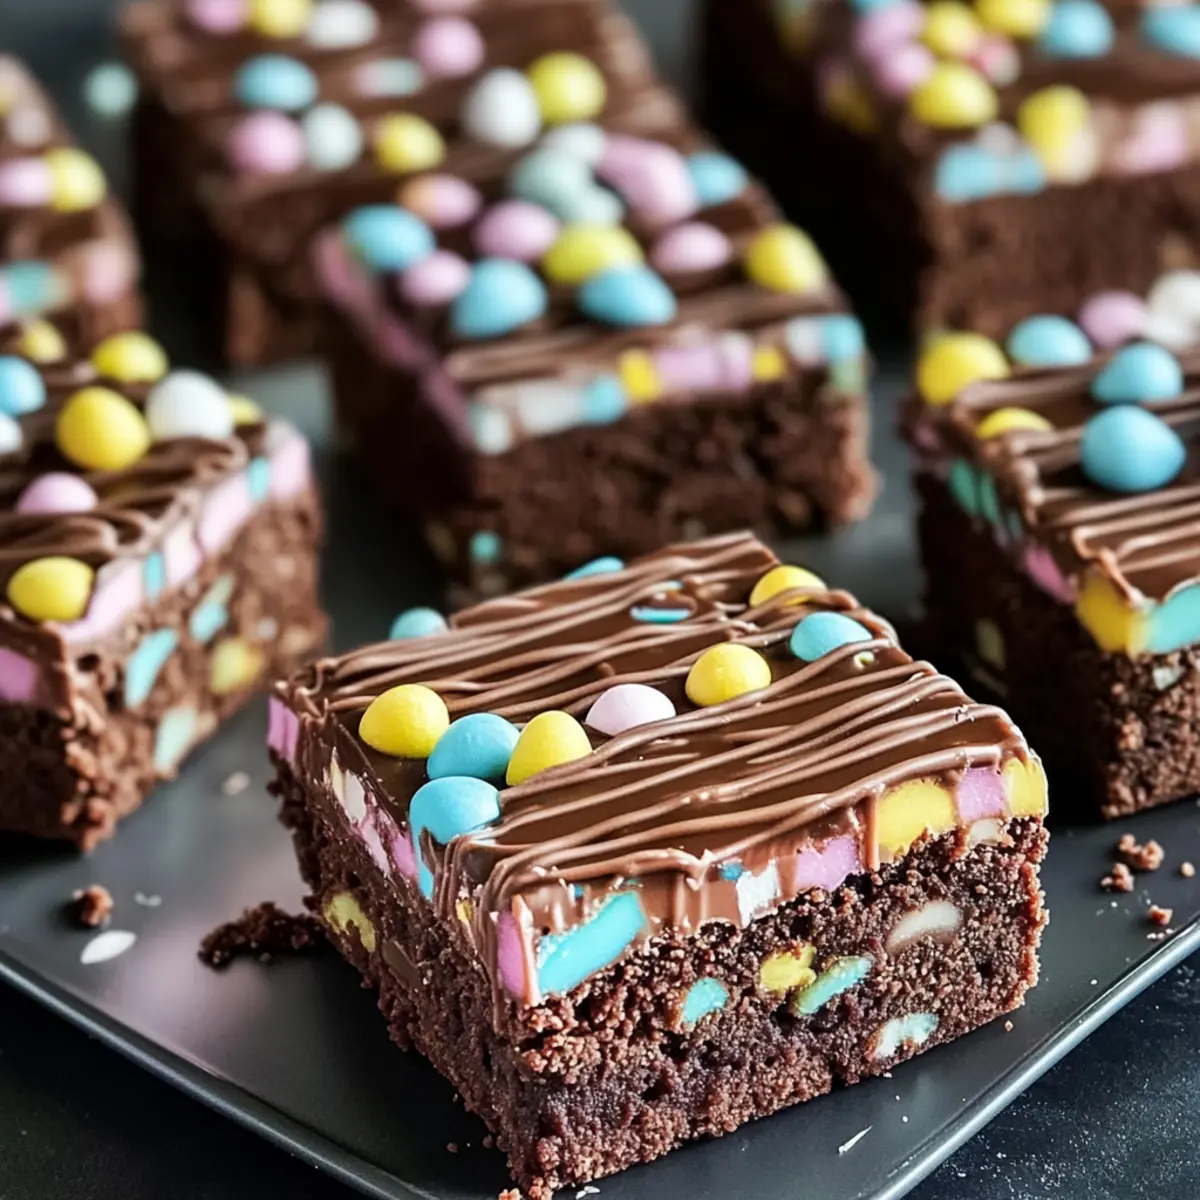
As I stood in my kitchen, the sweet aroma of melting chocolate filled the air, reminding me of childhood Easters spent surrounded by family. The moment you take a bite of these Easter Brownies, you’ll understand why they’ve become my go-to dessert for spring celebrations. Each rich, fudgy brownie is a delightful combination of chewy texture and a hint of coffee, all topped with playful, colorful decorations that appeal to both kids and adults. Not only are these Easter Brownies Recipe easy to whip up, but they also bring a festive touch that brightens any gathering. Perfect for bringing a smile to faces young and old, who can resist a delicious chocolatey treat adorned with pastel candies? Are you ready to create some holiday magic in your kitchen?
What makes this brownie recipe special?
Festive and Fun: These Easter brownies bring a burst of color to your table, making every bite a delightful celebration of spring.
Chewy Perfection: The unique combination of fudgy texture and a hint of coffee elevates these brownies, satisfying even the most discerning chocolate lover.
Family-Friendly: Perfect for gatherings, these brownies are adored by kids and adults alike, creating sweet memories together.
Easy to Make: With simple ingredients and straightforward steps, you can whip up these treats in no time—ideal for last-minute holiday baking!
Customizable Toppings: You can adapt the festive decorations to suit any occasion, much like how I love to switch things up for my Pancake Muffins Bites or Crockpot Chili.
Irresistible Aroma: The heavenly scent of melted chocolate will fill your kitchen, enticing everyone to gather and indulge!
Easter Brownies Recipe Ingredients
• Get ready to indulge in a rich, chocolatey experience!
For the Brownies
- Butter – Adds richness and moisture; use unsalted for better flavor control.
- Granulated Sugar – Provides sweetness and a crisp texture on top.
- Brown Sugar – Contributes moisture and a chewy center with a hint of caramel flavor.
- Eggs – Bind ingredients for a dense texture; use large eggs at room temperature.
- Vanilla Extract – Enhances flavor; pure vanilla is preferred for better taste.
- All-Purpose Flour – Provides structure; can substitute with a gluten-free blend in equivalent measures.
- Cocoa Powder – Deepens chocolate flavor; ensure it’s unsweetened for balanced sweetness.
- Salt – Enhances overall flavors; always a necessary addition in baking.
- Chocolate Chips – Add pockets of melted chocolate; opt for semi-sweet for a balanced flavor or dark chocolate for more richness.
For the Topping
- Coconut Oil – Used for a glossy chocolate layer; can substitute with vegetable oil if needed.
- White Chocolate – Adds a sweet, creamy layer; use gel food coloring for vibrant pastels.
- Sprinkles and Mini Candy Eggs – Decorative toppings to enhance appearance and add festive fun to your Easter brownies recipe.
Step‑by‑Step Instructions for Easter Brownies Recipe
Step 1: Preheat and Prepare
Preheat your oven to 350°F (175°C) and prepare a 9×13-inch baking dish by lining it with parchment paper. This step ensures easy removal of your Easter brownies later. Make sure the edges are well covered, allowing for a smooth finish on your delicious chocolate treat.
Step 2: Melt the Butter and Sugar
In a medium saucepan, melt 1 cup of butter over low heat. Once melted, remove the pan from heat and stir in both granulated and brown sugar until fully combined. The mixture should appear glossy and slightly thickened. Allow it to cool for a few minutes as you gather the other ingredients for your Easter brownies.
Step 3: Add Eggs and Vanilla
Beat in 4 large eggs, one at a time, mixing well after each addition until the mixture becomes smooth. Follow this with a tablespoon of pure vanilla extract for added flavor, ensuring everything is thoroughly blended. This step is crucial for achieving that rich, fudgy consistency you desire in these Easter brownies.
Step 4: Mix Dry Ingredients
In a separate bowl, sift together 1 cup of all-purpose flour, 1 cup of unsweetened cocoa powder, and a pinch of salt. Gradually incorporate this dry mixture into the wet ingredients, stirring gently. Take care not to overmix—your goal is a luscious brownie batter that maintains some texture.
Step 5: Fold in Chocolate Chips
Once the dry ingredients are integrated, fold in 1 cup of semisweet chocolate chips, distributing them evenly throughout the batter. The chips will melt slightly during baking, creating delightful pockets of gooey chocolate essence within your Easter brownies, enhancing their overall flavor.
Step 6: Pour and Smooth
Pour the brownie batter into the prepared baking dish, using a spatula to spread it evenly across the bottom. Aim for a flat surface to ensure even baking. This is the moment you can already start to smell that chocolatey goodness filling your kitchen!
Step 7: Bake to Perfection
Place the baking dish in the preheated oven and bake for 30-35 minutes. To check for doneness, insert a toothpick into the center—the toothpick should come out with a few moist crumbs, indicating that your brownies are perfectly fudgy.
Step 8: Cool Completely
Once baked, remove the dish from the oven and let the brownies cool in the pan for about 15 minutes. Afterward, transfer them to a wire rack to cool completely. This cooling stage is essential before adding your decorative topping to keep the layers distinct and prevent melting.
Step 9: Prepare Topping
In the meantime, melt 1 cup of chocolate chips along with 2 tablespoons of coconut oil in a microwave-safe bowl. Heat in 30-second intervals, stirring in between, until the mixture is smooth and glossy. This silky topping will lend a beautiful finish to your Easter brownies.
Step 10: Decorate Brownies
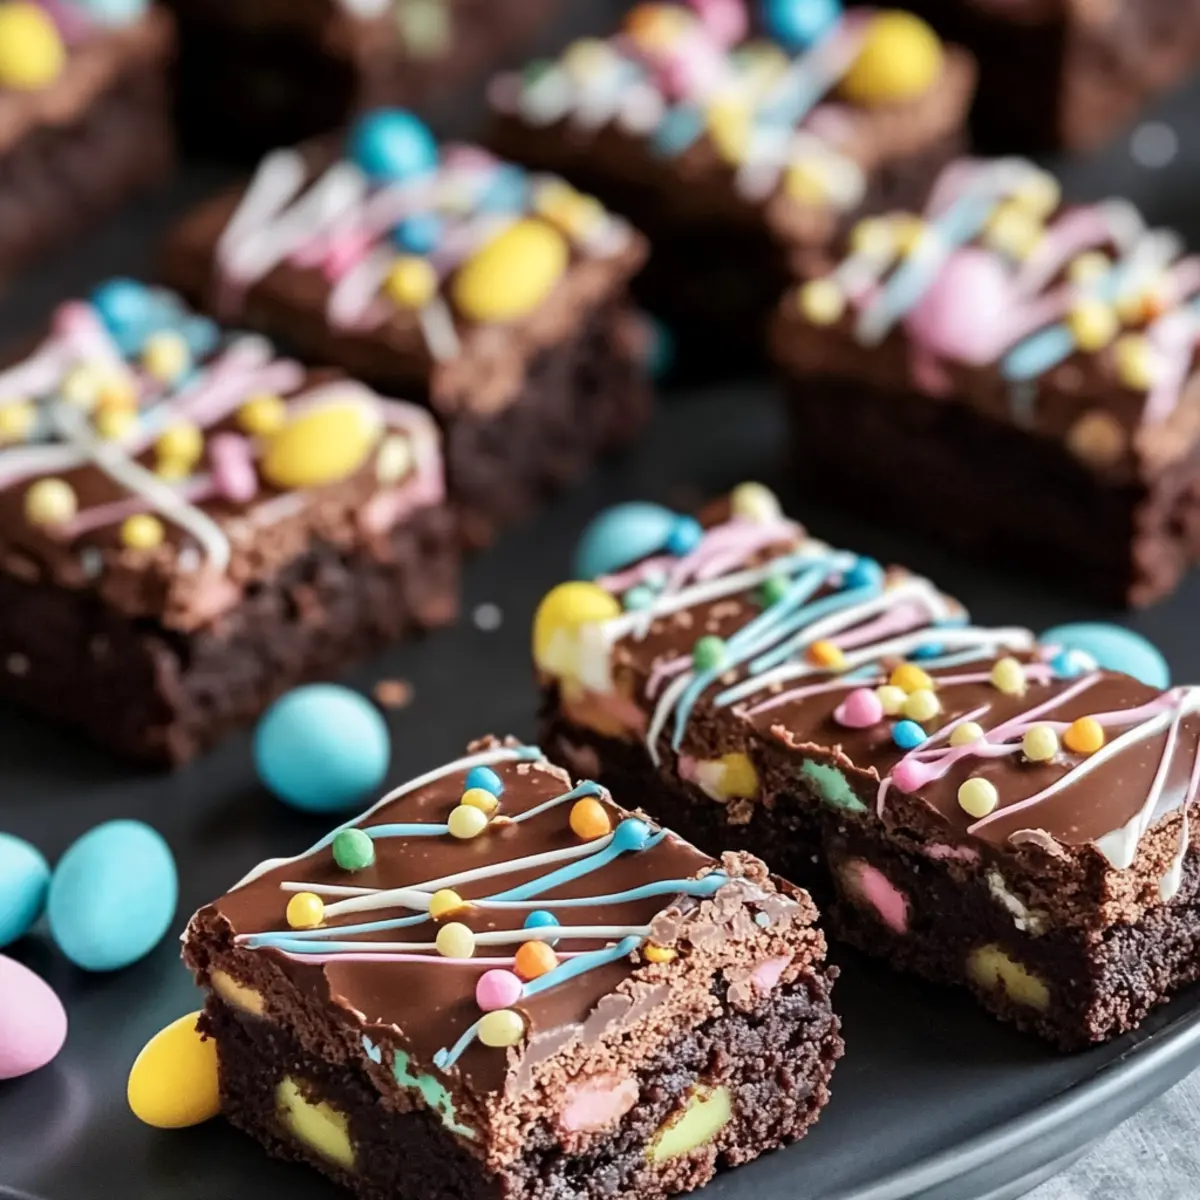
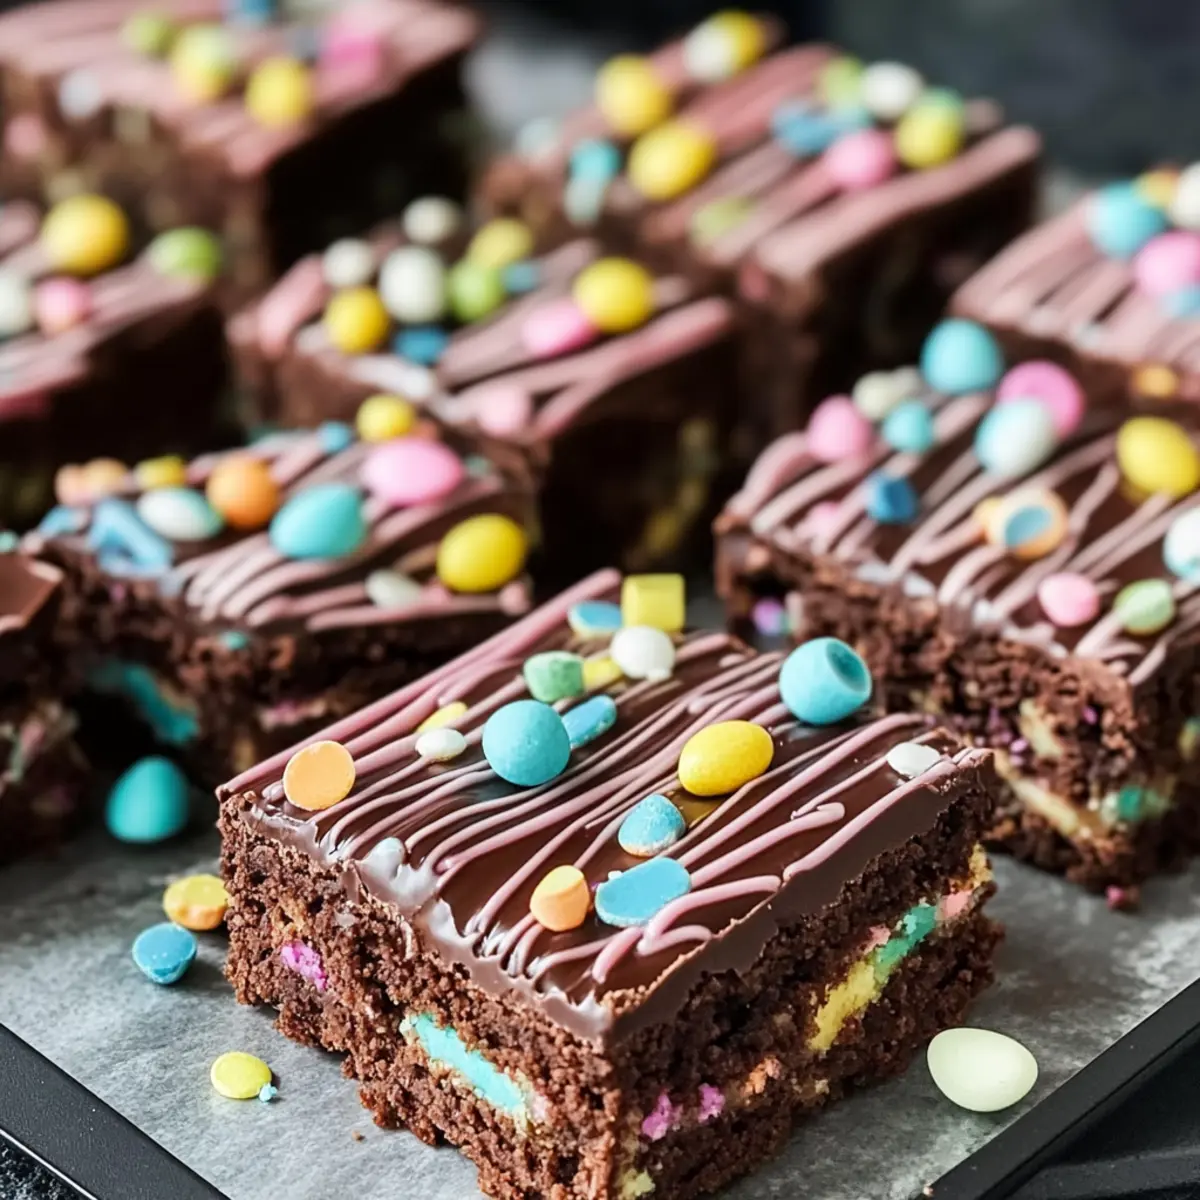
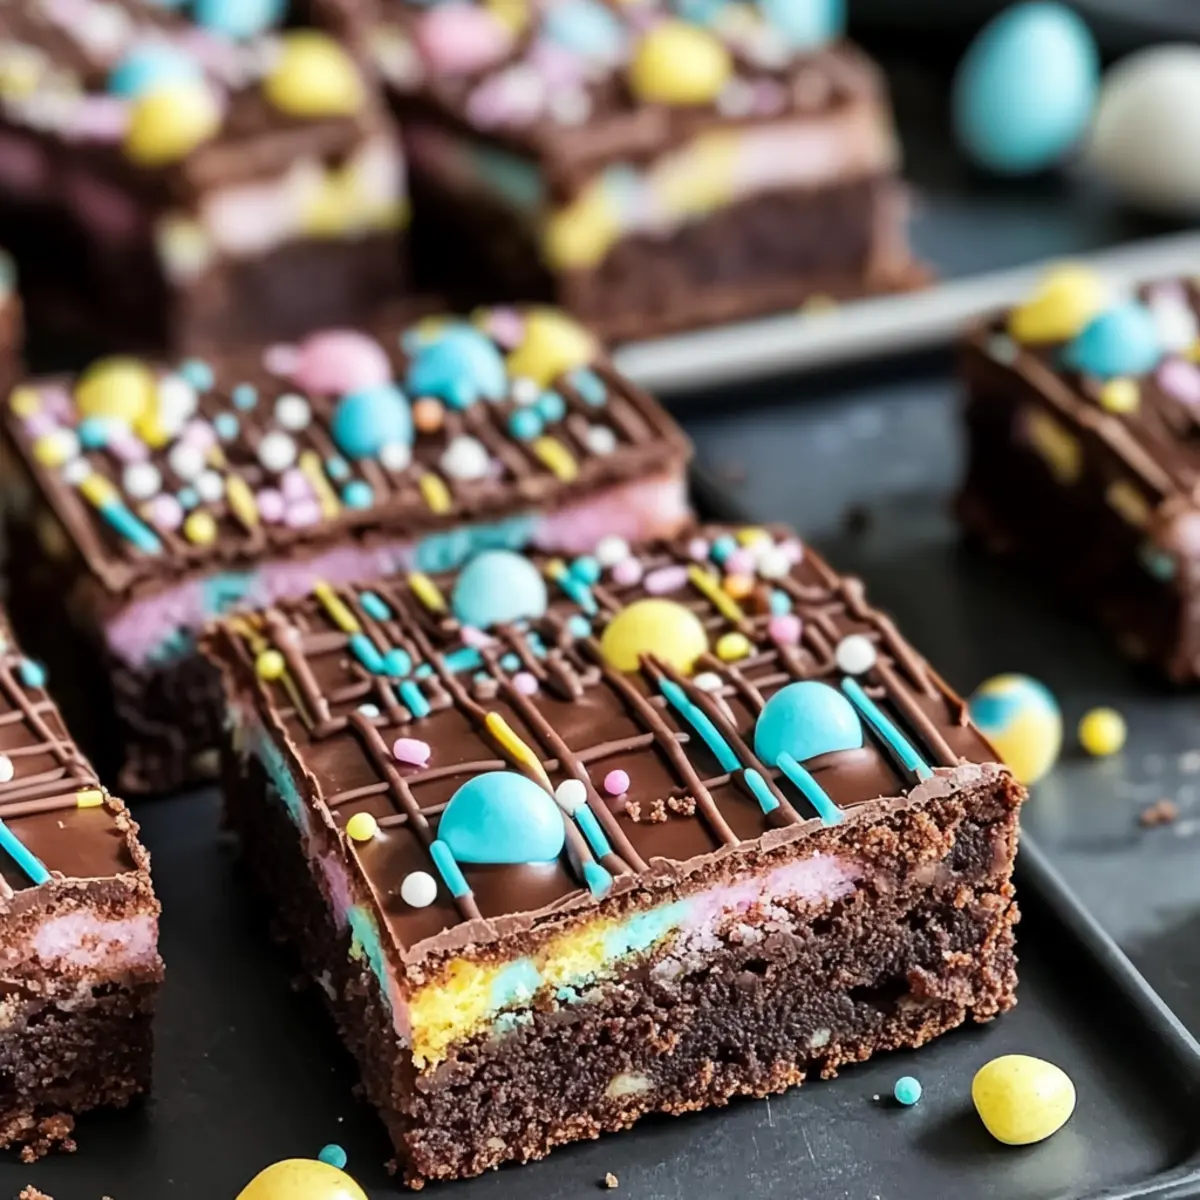
Once the brownies have cooled completely, pour the melted chocolate mixture over them, using a spatula to spread it evenly. Allow this layer to set slightly before decorating with tinted white chocolate, sprinkles, and mini candy eggs for that festive touch that celebrates Easter.
Step 11: Slice and Serve
After the toppings have set, use a warm, sharp knife to slice the brownies into squares. Warming the knife helps achieve clean cuts. Now your Easter brownies are ready to be shared with family and friends, combining flavor and festive cheer in each delicious bite!
Make Ahead Options
These Easter Brownies are perfect for busy home cooks looking to save time during holiday festivities! You can prepare the brownie batter up to 24 hours in advance; simply cover it tightly and refrigerate to maintain its rich, fudgy texture. Additionally, you can bake the brownies a day ahead and let them cool completely before storing them in an airtight container at room temperature for up to 3 days. When you’re ready to serve, just prepare the topping and decorate them with tinted white chocolate, sprinkles, and mini candy eggs. This way, you’ll have delicious, festive treats at your fingertips, making your celebrations effortlessly sweet!
Expert Tips for Easter Brownies
- Doneness Check: Use a toothpick to test for doneness; it should come out with a few moist crumbs for perfect fudginess in your Easter brownies.
- Cooling Time: Allow the brownies to cool completely before adding the glossy topping to prevent melting. This step ensures your layers remain distinct.
- Cutting Technique: For clean cuts, warm a knife under hot water and wipe it dry before slicing the brownies. This will give you beautiful, neat squares.
- Ingredient Substitutions: If you’re out of cocoa powder, consider using dark chocolate for an even richer flavor in your Easter brownies.
- Decorate Creatively: Feel free to swap out toppings based on the holiday or season; colorful candies or seasonal sprinkles can keep things fresh and fun!
- Extra Flavor Boost: Add a splash of brewed coffee or espresso to the batter for an intensified chocolate flavor—your taste buds will thank you!
What to Serve with Easter Brownies
Imagine a table adorned with delightful and comforting dishes that perfectly complement the rich, chocolatey goodness of these festive brownies.
- Vanilla Ice Cream: The creamy, cool texture contrasts beautifully with the chewy brownies, creating a luscious dessert experience.
- Fresh Berries: A medley of strawberries and raspberries adds a bright, tangy flavor that cuts through the sweetness of the brownies.
- Whipped Cream: Light and fluffy, this classic topping offers a dreamy texture that balances the rich chocolate. You could even infuse it with a hint of vanilla to elevate the experience!
- Coffee: A robust cup of brewed coffee enhances the chocolate flavor and adds a delightful warming sensation, making it a great pairing for any time of day.
For a fun twist, serve the brownies with a side of Chocolate Sauce for drizzling, inviting everyone to indulge to their heart’s content. This simple addition makes dessert feel more extravagant and enhances every bite of your Easter brownies!
Easter Brownies Recipe Variations
Feel free to let your creativity shine by customizing these delightful Easter brownies to suit your taste!
-
Coffee-Infused: Add a splash of cooled brewed coffee or espresso to intensify the chocolate flavor for a lovely depth.
-
Different Chocolates: Experiment with dark or milk chocolate for the topping, adjusting sweetness and richness to your preference. Try a combination for added complexity!
-
Seasonal Toppings: Change up the decorations by using seasonal candies, sprinkles, or colored chocolate chips to match any holiday or celebration theme. Just think how sweet these would look decorated for Halloween or Christmas!
-
Nutty Crunch: Fold in chopped nuts like walnuts or pecans into the brownie batter for a crunchy texture contrast—heavenly when paired with that chewy interior!
-
Vegan Option: Substitute eggs with flaxseed meal or applesauce, and use vegan chocolate for a plant-based version that everyone can enjoy.
-
Gluten-Free: Swap all-purpose flour for a gluten-free blend or almond flour to cater to gluten-sensitive guests without compromising on taste.
-
Minty Twist: Incorporate 1 teaspoon of peppermint extract into the batter for a refreshing minty flavor, making these treats feel even more festive!
-
Fruit-Filled: Add chopped fruits like raspberries or cherries into the batter for a surprising burst of flavor and a touch of tartness in every bite. You might also enjoy pairing them with fresh berries on the side!
And if you’re looking for something different to bake in the meantime, consider trying my delicious Banana Bread Brownies or whip up some comforting Honey Garlic Ground Turkey. The possibilities are endless!
How to Store and Freeze Easter Brownies
Room Temperature: Keep brownies in an airtight container at room temperature for up to 3 days. This keeps them fresh and maintains their chewy texture.
Fridge: If you want to extend their shelf life, refrigerate the Easter brownies for up to 1 week. Make sure they’re well wrapped to prevent moisture loss and absorption of fridge odors.
Freezer: For longer storage, freeze the brownies! Wrap them tightly in plastic wrap and then in aluminum foil. They can last in the freezer for up to 3 months without losing flavor.
Reheating: When ready to enjoy, simply thaw the brownies in the fridge overnight. To warm up, microwave them for about 10-15 seconds or until just heated through, making the chocolate chips wonderfully gooey again.
Easter Brownies Recipe FAQs
How do I choose the best chocolate for my brownies?
Absolutely! When selecting chocolate chips, I recommend using semi-sweet chocolate for a balanced flavor. If you prefer a deeper chocolate experience, dark chocolate chips work wonderfully too. Look for high-quality brands that have a good cocoa percentage for the richest taste.
What’s the best way to store leftovers?
Very! To store your Easter brownies, place them in an airtight container at room temperature for up to 3 days to maintain their chewy texture. If you’d like to keep them fresh longer, transfer them to the fridge where they can last for up to a week. Just ensure they’re well-wrapped to avoid moisture loss!
Can I freeze Easter brownies?
Absolutely! To freeze your Easter brownies, first, let them cool completely. Then, wrap them tightly in plastic wrap, followed by a layer of aluminum foil. This method will keep them fresh for up to 3 months. When you’re ready to enjoy them, thaw them in the fridge overnight, and for an extra treat, warm them up in the microwave for about 10-15 seconds to revive that gooey chocolate goodness.
What should I do if my brownies are too dry?
Don’t fret! If your Easter brownies turn out too dry, next time ensure you don’t overbake them. The toothpick test is key—when it comes out with a few moist crumbs, they’re ready! If they’ve already cooled too much, serving them with a scoop of ice cream or whipped cream can help enhance moisture and enjoyment.
Are there any dietary considerations for allergies?
Absolutely! This recipe contains common allergens like eggs and dairy. For a dairy-free option, substitute the butter with a plant-based alternative and use dairy-free chocolate chips. If you’re managing nut allergies, just be sure to read labels carefully, as some chocolate brands may process their products in facilities that handle tree nuts.
Easter Brownies Recipe: Chewy Chocolate Goodness Awaits
Ingredients
Equipment
Method
- Preheat your oven to 350°F (175°C) and prepare a 9x13-inch baking dish by lining it with parchment paper.
- In a medium saucepan, melt 1 cup of butter over low heat. Remove from heat and stir in both sugars until fully combined.
- Beat in 4 large eggs, one at a time, mixing well after each addition, then add 1 tablespoon of vanilla extract.
- Sift together 1 cup of flour, cocoa powder, and salt in a separate bowl. Gradually incorporate this into the wet mixture.
- Fold in 1 cup of chocolate chips evenly throughout the batter.
- Pour the batter into the prepared baking dish and spread it evenly.
- Bake for 30-35 minutes, checking for doneness with a toothpick.
- Cool in the pan for 15 minutes before transferring to a wire rack.
- Melt 1 cup of chocolate chips with 2 tablespoons of coconut oil until smooth.
- Pour the melted chocolate over the cooled brownies and let it set slightly. Decorate with white chocolate, sprinkles, and mini candy eggs.
- Slice into squares after the toppings have set.
Leave a Reply